I am currently investigating decorations for the wedding, I briefly thought about paying someone but decided that it was way too expensive and also...I am pretty fussy I don't think I could leave it to the whims of someone else.
In case you don't read all my blog posts my wedding colours have been decided as Plum, White and a bit of silver. Knowing this makes my life a million times easier!
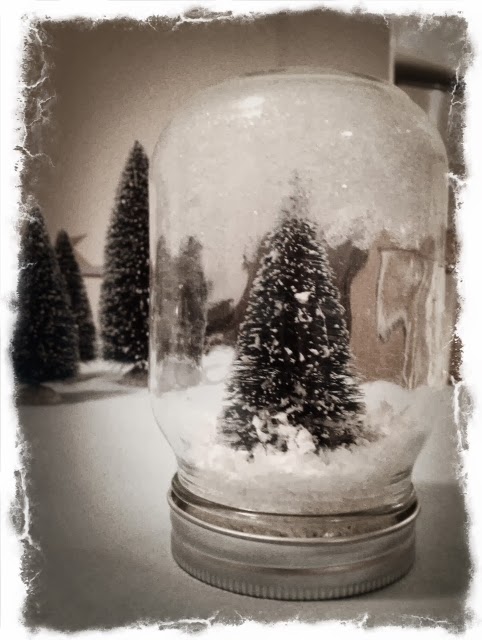
I pretty much just google imaged decorations, as well as searched on Pinterest and also Etsy for ideas. But I fell in love with these little DIY Snowglobes.

I decided to make my own, which unfortunately meant I absolutely HAD to make them now, realistically before I got excited about making them I should have taken a step back and realised that buying christmas stuff like fake snow and mini trees in June is pretty impractical. But regardless I soldiered on! (Yes I actually made these back in June, but I did get everything really cheap!).
As it turns out, it was difficult but not impossible, a nice little challenge. Below is a list of things I bought to make them, along with, if you are in Australia, where I got them from.
Things I bought:
1. Mason Jars (I got these from Spotlight )
2. Silver Spray Paint (Bunnings!).
3. Twinklets diamond dust (Scrapdragon.com.au)
4. Distress Dry Rock Candy (My local stamp shop).
6. Coarse white glitter (Spotlight)
8. Christmas Trees (Christmaswarehouse.com.au)
9. Little reindeer (Ebay, these cost me like $2 for 12 but I had to search around).
10. Fake snow - (I actually can't remember but a big bag cost me $4 from a party shop!)
Luckily everything except the Mason Jars were on sale at the time, especially the Christmas related goodies, turns out it pays to buy out of season!! Maybe if you aren't in a rush buy just after Christmas, it will be easier and cheaper! I ended up saving over 80% on most of the items.
Note: I actually made the snowmen myself out of Fimo modelling clay, which I bought to make some other things for the wedding which I will show later when I'm done.
You are probably thinking, Holy Moly that is a lot of glitter. You are right it is but I need the glitter for the rest of my decorations anyway and I was very particular about the look of my glitter! Seriously I have used that glitter for EVERYTHING, and I have so much left. But really, you can never have too much glitter.
How to make the snow
The snow was the easiest and funnest part to make, I mixed in a plastic cup the fake plastic snow (which is basically shredded white plastic) along with the Diamond dust, Dry Rock Candy and Coarse white glitter. This just made the snow sparkle a little rather and being so flat!
The Trees
You can use the trees as is, I kept some of them in their natural state but I also painted some glue on them and covered them in my special glitter combination which made them sparkle like real trees in the snow!
The Jars
Some of my jars I left without glitter on the top but I really liked that look so I did it on a bunch of them as well I think it finished them off. It was really easy I just smooshed some glue on the bottom with a paintbrush poured my special glitter combination in, screwed the lid on and shook the jar. (Take the lid off when your done and let it dry, it smells bad otherwise).
Anyway, here are my finished masterpieces! I hope you like them. (More pics to come).

I decided we wont use them at the wedding, too Christmasy but I think they are pretty awesome and will make nice decorations on my table.
Mandy


0 comments:
Post a Comment